Turtle candies have long been celebrated as a classic confection that delights with its perfect blend of textures and flavors. These sumptuous treats combine the crunch of toasted pecans, the indulgence of soft, rich caramel, and the silky smoothness of melted chocolate. Ideal as a thoughtful gift or a self-indulgent dessert, these candies evoke a sense of nostalgia while showcasing the rewards of homemade craftsmanship.
In this comprehensive guide, we offer a detailed, step-by-step breakdown of how to create these delicious turtle candies at home. From ingredient selection to precise cooking techniques and creative presentation ideas, this article is designed to equip you with all the knowledge necessary to master this timeless recipe. Whether you’re an experienced cook or a novice in the kitchen, our methodical approach will ensure your turtle candies turn out perfectly every time.
I. Historical Context and Culinary Significance
A. Origins of Turtle Candies
Turtle candies first emerged as a popular treat in the mid-20th century, quickly becoming a beloved classic in American confectionery. Their name is derived from the candy’s resemblance to a turtle’s shape—pecans representing the legs and tail, and the smooth chocolate forming a shell-like covering. Over the decades, this treat has maintained its status as both a luxurious indulgence and an artisanal craft. The enduring popularity of turtle candies can be attributed to their harmonious contrast of textures and flavors, which delight the palate with every bite.
B. The Art of Making Confections at Home
Homemade confections like turtle candies celebrate the joys of artisanal cooking, where attention to detail and quality ingredients transform simple components into a gourmet delight. Making these candies at home empowers you to tailor the flavors to your taste, experimenting with different types of chocolate or even infusing the caramel with subtle hints of vanilla or sea salt for an extra twist. This guide provides not only the recipe but also expert tips to help you navigate potential challenges, ensuring that your final product is both visually stunning and delectably satisfying.
II. Essential Ingredients and Their Roles
Before diving into the cooking process, it is important to understand the key ingredients and their specific contributions to the final product. The perfect turtle candy balances flavor, texture, and visual appeal, and each component plays a pivotal role in achieving this harmony.
A. Caramel: The Heart of the Candy
Caramel offers a buttery, luscious sweetness that acts as the binding element between the pecans and chocolate. For this recipe, you will need 12 ounces of soft caramels. You have the option of using store-bought caramels for convenience or making them from scratch for a more personalized touch. Homemade caramels allow for greater control over flavor and texture, but require patience and careful attention during the cooking process.
B. Pecans: Crunch and Nutty Depth
Pecans provide a robust, nutty flavor and a satisfying crunch, making them a critical texture element in turtle candies. You will need 6 ounces of pecan halves. Toasting the pecans is key to unlocking their full flavor potential; the toasting process also enhances their crunch, elevating the overall sensory experience.
C. Chocolate: The Luxurious Finishing Touch
The final ingredient, 8 ounces of semi-sweet chocolate, serves as the delicious outer layer that holds everything together. Its smoothness complements the chewy caramel and the crisp pecans, ensuring a multi-dimensional treat that melts effortlessly in your mouth. The choice of semi-sweet chocolate strikes a balance between the inherent sweetness of the caramel and the nutty richness of the pecans.
III. Equipment and Preparatory Steps
Before starting the recipe, ensure that your kitchen is well-prepared. Having the right tools and a clear plan will make the process smoother and more enjoyable.
A. Essential Kitchen Tools
-
Oven: Preheated to 350°F (175°C) for toasting pecans.
-
Baking Sheet: Lined with parchment paper to prevent sticking.
-
Microwave or Saucepan: For melting caramels and chocolate.
-
Mixing Bowls: For combining ingredients and stirring.
-
Measuring Cups and Spoons: To ensure accurate ingredient proportions.
-
Spatula or Spoon: For stirring and spooning the melted ingredients.
B. Ingredient Preparation
-
Pecans: Measure 6 ounces of pecan halves. Spread them evenly on a parchment-lined baking sheet for toasting.
-
Caramels: If using store-bought caramels, ensure they are soft and pliable. For homemade caramels, prepare them in advance and allow them to cool slightly before melting.
-
Chocolate: Break 8 ounces of semi-sweet chocolate into smaller pieces to facilitate even melting later in the process.
IV. Step-by-Step Recipe for Turtle Candies
Step 1: Toasting the Pecans
Toasting the pecans is essential for enhancing their flavor and crunch. Preheat your oven to 350°F (175°C). Arrange the pecan halves in a single layer on the prepared baking sheet. Place the sheet in the oven and toast the pecans for 8–10 minutes, or until they emit a nutty aroma and acquire a golden-brown hue. Monitor them closely to prevent burning, as pecans can quickly go from perfectly toasted to overdone. Once toasted, remove the pecans from the oven and allow them to cool to room temperature.
Step 2: Melting the Caramels
While the pecans are cooling, focus on the caramels. Place 12 ounces of soft caramels in a microwave-safe bowl. Microwave the caramels in 30-second intervals, stirring after each interval to ensure even melting. Alternatively, you can melt the caramels in a small saucepan over low heat, stirring constantly. The goal is to achieve a smooth, uniform consistency without overcooking them. Once the caramels have melted completely, set the bowl aside for the next phase of assembly.
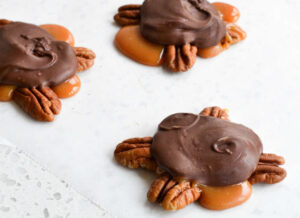
Step 3: Forming the Candy Clusters
Prepare a large, parchment-lined baking sheet for assembling the turtle candy clusters. Begin by arranging the toasted pecans into small clusters of 3–4 halves each. Think of each cluster as resembling a turtle’s legs and tail—this creative configuration will serve as the base for your candy.
Using a spoon, carefully drizzle about one tablespoon of the melted caramel over each pecan cluster. Ensure the caramel flows over and binds the pecans together, creating a cohesive unit. After depositing the caramel, allow the clusters to rest for 10–15 minutes. This resting period lets the caramel set slightly, firming up the structure of the clusters and making them easier to handle in subsequent steps.
Step 4: Adding the Chocolate Layer
Following the caramel setting period, it’s time to prepare the chocolate layer. Place the 8 ounces of semi-sweet chocolate in a microwave-safe bowl or a small saucepan. Like the caramels, melt the chocolate either in the microwave using 30-second intervals—with stirring between intervals—or slowly over low heat in a saucepan, stirring continuously. Aim for a glossy, smooth finish.
Once the chocolate has melted completely, spoon approximately one tablespoon over each caramel-pecan cluster. Take care to spread the chocolate evenly, ensuring that it covers the caramel thoroughly. This chocolate coating will not only add a rich flavor but also serve as a protective shell that preserves the delicate textures inside.
Step 5: Allowing the Candies to Set
After applying the chocolate layer, the turtle candies need time to cool and set. Leave the assembled clusters at room temperature for about one hour to allow the chocolate and caramel to solidify properly. If you’re pressed for time, you can expedite the setting process by placing the candies in the refrigerator for 20–30 minutes. However, be mindful that refrigeration might slightly alter the texture of the caramel, so adjust according to your preference.
V. Serving Suggestions and Creative Presentations
Turtle candies are versatile treats that can be enjoyed on their own or as part of a larger dessert array. Here are some ways to present and serve these delectable confections.
A. Elegant Dessert Platters
Arrange the finished turtle candies on an attractive dessert platter, garnished with a scattering of whole pecans or a light dusting of cocoa powder. These platters are ideal for sophisticated dinner parties or holiday gatherings, offering a visually appealing and delectable conclusion to a meal.
B. Gift-Ready Packaging
If you plan to give turtle candies as a gift, consider packaging them in decorative tins or small, resealable bags tied with a ribbon. Personalized labels or tags with a festive greeting can add an extra touch of thoughtfulness. These handmade treats are sure to be appreciated by anyone with a sweet tooth or a love for gourmet confections.
C. Pairing with Beverages
Turtle candies pair exceptionally well with a variety of beverages. Consider serving them alongside a rich cup of coffee, a robust tea, or even a smooth dessert wine. The interplay of flavors can enhance the overall sensory experience, making for a delightful treat during afternoon tea or as an after-dinner indulgence.
VI. Storage and Shelf-Life Considerations
Proper storage is essential to preserve the quality and texture of your homemade turtle candies. Here are some tips to ensure your treats remain as delicious as the day they were made.
A. Short-Term Storage
For immediate enjoyment, store the turtle candies in an airtight container at room temperature. Under these conditions, the candies will retain their freshness and appealing texture for up to one week. Be sure to keep them away from direct sunlight or extreme temperatures, which could cause the chocolate to melt or the caramel to become overly sticky.
B. Extended Storage
If you need to store the candies for a longer period, place them in the refrigerator. In a refrigerated environment, the turtle candies will remain fresh for up to two weeks. However, note that refrigeration might slightly alter the texture, making the caramel firmer. To restore optimal flavor and texture, allow the candies to return to room temperature before serving.
C. Freezing Options
While not traditionally recommended due to potential changes in texture upon thawing, turtle candies can be frozen if necessary. Place them in a freezer-safe container, and thaw them slowly in the refrigerator for best results. Be aware that repeated thawing and refreezing can compromise the quality of the treats.
VII. Troubleshooting and Expert Tips
Even with a well-written recipe, there can be challenges along the way. Here are some troubleshooting tips and expert advice to ensure your turtle candies turn out perfectly.
A. Common Issues and Solutions
-
Caramel Not Melting Smoothly:
If your caramel does not reach a smooth consistency, try stirring it more vigorously while melting. Using a microwave might require shorter time intervals to prevent overheating. If using a saucepan, maintain a low flame and stir constantly. -
Pecans Over-Toasted:
Pecans can quickly become over-toasted if left in the oven too long. Set a timer and check them frequently during the final minutes. Over-toasted pecans can develop a bitter taste, which detracts from the candy’s overall flavor. -
Chocolate Seizing:
Chocolate may seize if it comes into contact with moisture. Ensure all utensils and bowls are dry when melting chocolate. Stir gently and avoid overheating to maintain a smooth, glossy finish. -
Uneven Coating:
When applying the caramel or chocolate, use a steady hand and consider using a small offset spatula for better control. If any gaps occur in the coating, a quick drizzle with the melted ingredient can help even things out.
B. Expert Tips for Perfecting the Recipe
-
Experiment with Flavors:
While the classic recipe is delightful on its own, consider adding a dash of sea salt to the melted caramel for a salted caramel variation. You could also infuse the chocolate with a hint of mint or orange zest for a unique twist. -
Temperature Control:
Invest in a reliable kitchen thermometer to monitor the temperature of your caramel and melted chocolate. Precision in temperature control can make the difference between a smooth, glossy finish and a mixture that is too thick or lumpy. -
Practice Patience:
The key to great turtle candies is allowing each component to set properly. Rushing the process by not waiting long enough between steps can result in a less cohesive final product. Patience will reward you with beautifully formed candies that have the right balance of textures.
VIII. Conclusion: Elevate Your Confectionery Craft
Creating homemade turtle candies is more than just a recipe—it is a celebration of culinary artistry and a testament to the joy of crafting something truly special from scratch. The combination of crunchy toasted pecans, soft, velvety caramel, and smooth, melted chocolate comes together to create a treat that captivates the senses and delights every palate.
By following this professional guide and paying close attention to each step, you can master the art of turtle candy making. Whether you’re preparing them as a festive gift or indulging in a personal treat, these candies offer a unique opportunity to showcase your culinary skills while honoring a beloved confectionery tradition.
We hope this in-depth guide has provided you with the insights, techniques, and creative ideas needed to produce impeccably delicious turtle candies. Remember, every batch you make is an opportunity to refine your method, experiment with flavors, and add your personal touch to this classic treat. Enjoy the process, and more importantly, savor every sweet bite of your homemade turtle candies.